

Pushfit
Reconnects 4″ and 6″ pipe from the inside, right where it’s cut off at the slab or wall. Push it in by hand. No breaking out concrete.
Pipe cut flush?
Keep the jackhammer in the truck.
When there’s no exposed pipe to clamp onto, Fernco ICON connects from the inside. Its pushfit design creates a watertight connection to pipe cut or broken flush with a concrete floor or wall—without breaking out the surrounding concrete. Save the demolition, cleanup and patching.

No concrete to break out
It seals inside the existing pipe, so there’s no demolition and nothing to patch afterward.
Works on cut-off pipe
Sheared, saw-cut or broken flush, with no pipe showing. Clean and smooth the end, and it’s ready.
Any pipe, any outside
It sizes to the inside diameter, so the new pipe doesn’t need to match the old one’s outside.
No tools
Soap and water on the gasket, then push to the pipe stop. When the stop sits flush, it’s seated.


A natural fit for vertical storm and vent connections.
ICON is especially useful for vertical stormwater and vent connections where concrete or tight access leaves no room for an external coupling. Its internal pushfit design creates a watertight connection inside the existing pipe, without breaking out the surrounding concrete.
Useful beyond vertical runs.
ICON also works in horizontal installations and sewer and DWV applications. Because it fits inside the pipe, it reduces the opening at the connection—a detail to weigh against the flow requirements of the job, particularly when carrying solids.
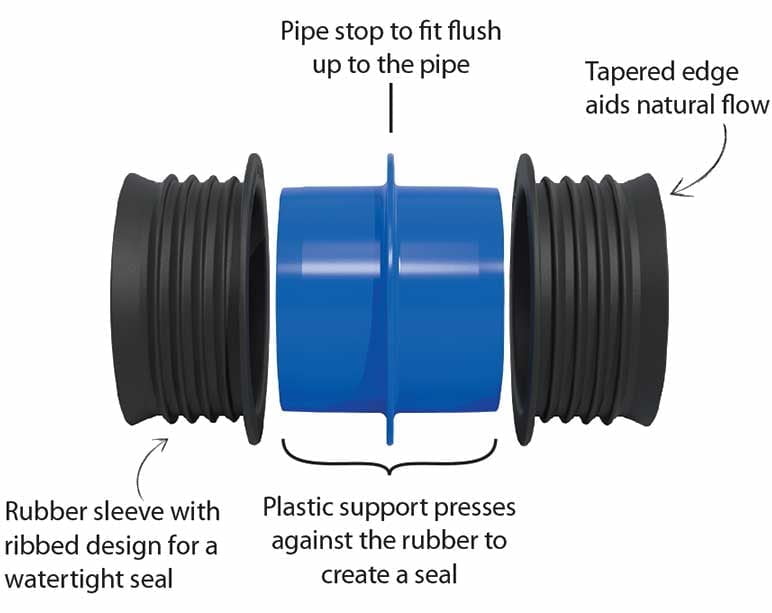
Engineered for a permanent, watertight connection.
A ribbed EPDM rubber sleeve over a rigid ABS core. Push it to the pipe stop and the core holds the rubber tight against the pipe wall.
- Several sealing ribs. The seal runs around the pipe wall at more than one point.
- Rigid ABS core. Keeps the rubber pressed out and resists shear.
- Pipe stop. Sits flush with the pipe end, so you can see the coupling is fully in.
- Internal lip and tapered edge. A smooth transition into the coupling that minimizes disruption to flow.
Available in 4″ and 6″.
Measure the inside diameter of both pipes to select the right ICON. Both measurements must fall within the fit range listed for that model.
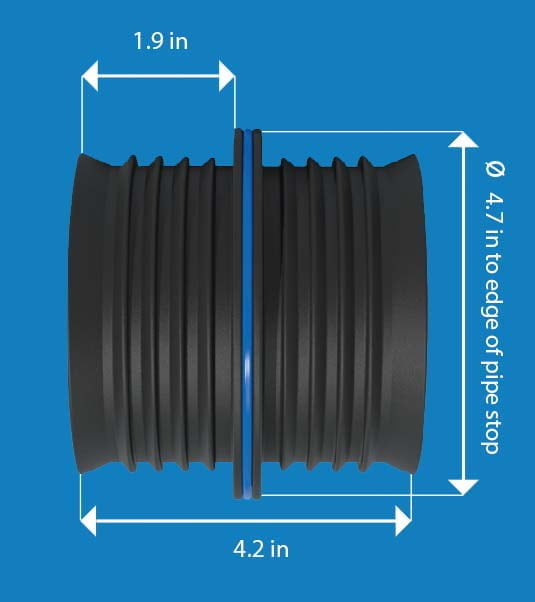
| Fits pipe I.D. | 3.90 – 4.06″ |
| Overall length | 4.25″ |
| Insertion per end | 1.95″ |
| Pipe stop Ø | 4.72″ |
| Bore Ø | 3.53″ |
| Box qty | 6 |

| Fits pipe I.D. | 5.83 – 6.02″ |
| Overall length | 6.73″ |
| Insertion per end | 3.18″ |
| Pipe stop Ø | 6.77″ |
| Bore Ø | 5.24″ |
| Box qty | 6 |
Dimensions from the Fernco part drawings. Bore is the inside diameter through the coupling.

Multiple pipe materials.
One ICON.
Working with PVC, copper or cast iron? ICON connects to the existing pipe in your wall or slab.
- Plastic sewer and DWV. SDR 35 and Schedule 40.
- Cast iron
- Copper
Four steps. Four minutes or less.
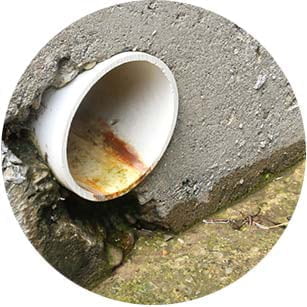 Clean and measureClean the pipe end, smooth any rough edges, and measure the inside diameter.
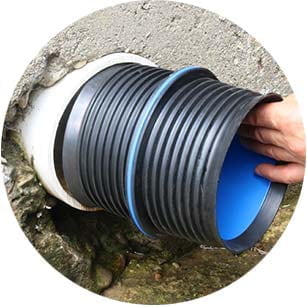 Lubricate the gasketWipe the outside of the gasket with soap and water.
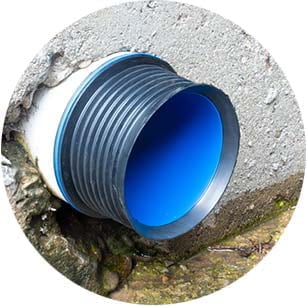 Push to the pipe stopPush the coupling in until the stop sits flush with the pipe end.
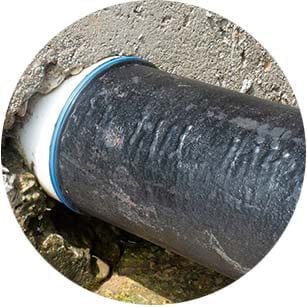 Add the new pipeLubricate the other gasket and push the new pipe on.
Specifications.
ABS body with an EPDM rubber gasket, meeting the requirements of ASTM C1173.
| Body | ABS, complies with ASTM D3965 |
| Gasket | EPDM rubber, complies with BS EN 681-1 and ASTM C1173 |
| Standard | Meets the requirements of ASTM C1173 |
| Installation | Tool-free pushfit, soap and water lubricant |
| Test pressure | 4.3 psi |
| Temperature range | −30°F to 140°F |
| Service | Sewer and DWV |
| Best suited | Vertical stormwater and vent connections |
| Pipe | Plastic (SDR 35, Schedule 40), cast iron and copper |
| Not compatible | SDR-26 pipe |
| Sizing | By inside diameter |
| Sizes | 4″ (IC44P) and 6″ (IC66P) |
- Smooth the pipe end. File down any rough or broken edges so they can’t catch the gasket.
- Measure the I.D. ICON fits by inside diameter, not nominal size.
- Check the pipe. Not for SDR-26.
- Watch the tapered edge. It must not fold back on insertion.
Literature.
Sell sheets and part drawings for ICON Pushfit.


Frequently asked questions.
Sizing, fit and installation answers for ICON Pushfit.
What is ICON best used for?
Connecting to pipe cut or broken flush with a concrete floor or wall, where there’s no exposed pipe to clamp onto. It’s especially useful for vertical stormwater and vent connections.
How do I pick the right size?
Measure the inside diameter of the pipe. IC44P fits 3.90″ to 4.06″ and IC66P fits 5.83″ to 6.02″. Go by the measurement, not the nominal size.
What pipe does ICON fit?
Plastic sewer and DWV pipe in SDR 35 and Schedule 40, cast iron and copper, as long as the inside diameter falls in the range. It is not compatible with SDR-26, whose thicker wall leaves too small an inside diameter.
How do I know it’s installed right?
Push until the pipe stop in the middle of the coupling sits flush against the pipe end. Before the new pipe goes on, check that the tapered edge of the rubber hasn’t folded back.
Do I need tools or cement?
No. Lubricate the gasket with soap and water and push it in by hand. There’s nothing to glue and no cure time.
What standards does it meet?
ICON meets the requirements of ASTM C1173 and is pressure tested to 4.3 psi. The gasket complies with BS EN 681-1 and ASTM C1173, and the ABS body with ASTM D3965.